Marty McGuire

Posts Tagged site-update

2023
Sat Sep 23

This map is made for you and me

Well, it's a rainy day and a good day for someday projects. Also, oops, here's a post about a tiny site update that accidentally sprawled into a post about 6 (or 14) years of my relationships with Foursquare and the whole idea of sharing "check in"s (not πŸ”s).

Oh no it's backstory time

In 2009 I was living in Pittsburgh, working as a research programmer at Carnegie Mellon, a proud member of the newly formed HackPGH hacker space, starting down the slippery slope of joining the 3D printing industry, and basically excited about technology and the future. It was in this context that I vaguely remember being talked into joining Foursquare, so friends and I could keep up with one another at our usual haunts around town.

I'm not sure how much serendipity it really enabled, but checkins did lead to conversations and a nice general awareness of what folks in my social network were up to. Oh, and some competition for points and mayorships, of course, thanks to gamification.

I made use of checkins pretty regularly, in town and on trips, across a move to Baltimore and starting a new job in the aforementioned 3D printing industry. And then in 2012 I stopped. I don't 100% remember making this a conscious choice, but I do recall that most of my friends who used the app regularly were far away in Pittsburgh, privacy and surveillance capital concerns were on the rise, and β€” heck β€” I probably changed phones or something and just plain didn't install it.

Fast-forward about 5 years to 2017 and I'm all-in on the IndieWeb community. After learning about it in ~2015, putting together my first blog since ~2003, and attending my first IndieWebCamp in NYC in 2016, I found myself in Portland, OR for the IndieWeb Summit.

And goodness these folks liked checking in with Foursquare (now Swarm)! They were tagging one another in the app, maximizing points with photos, just documenting the heck out of where we were going and what we were doing.

Aaron Parecki, one of the co-founders of IndieWeb, had set up a service called OwnYourSwarm which you could set up to watch your Swarm account for new checkins, at which point it would send 'em off your your website. While I probably should have been paying more attention to the excellent IndieWeb Summit discussions, I hacked up some bits of my site to understand posts from OwnYourSwarm and posted my first checkin to my own site.

OwnYourSwarm is still around and working well, despite some speedbumps over the years from Swarm API changes. Thanks, Aaron!

Okay, but something about maps?

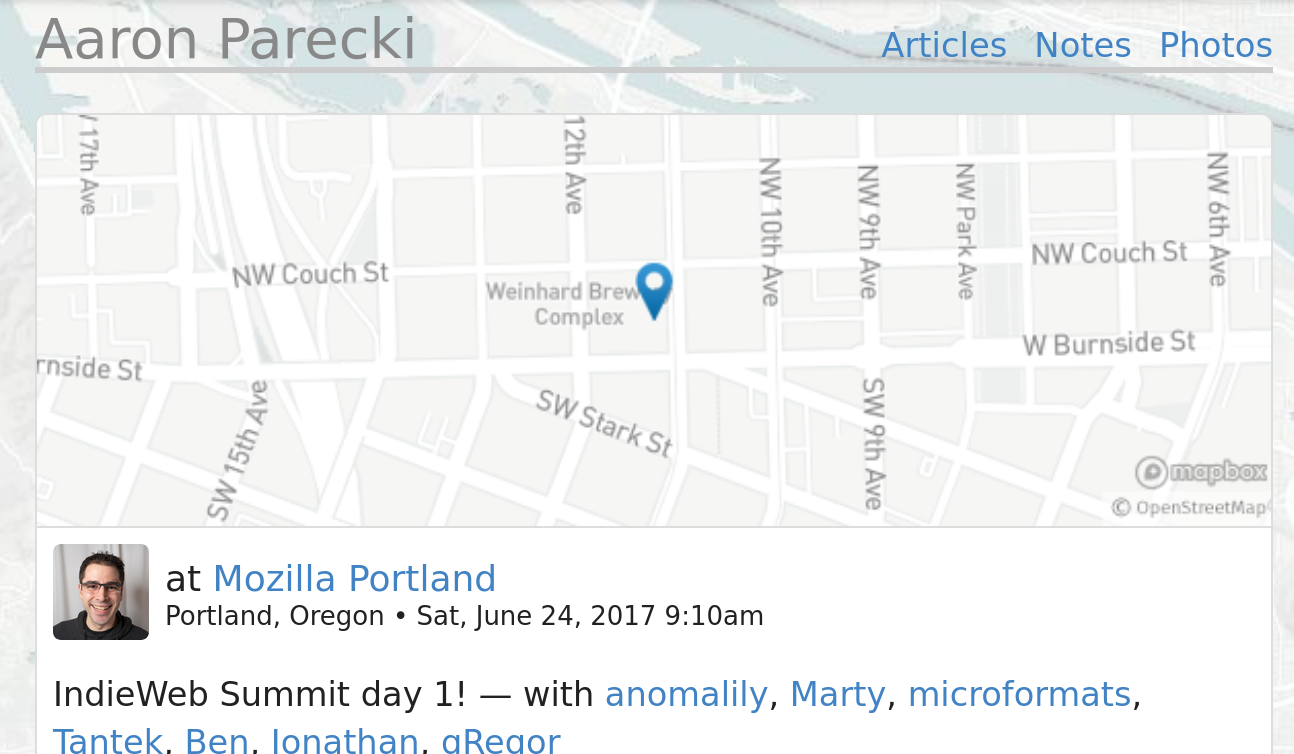
Speaking of Aaron, I was jealous of how good his checkin posts looked. Like this example checking in for IndieWeb Summit day 1. I specifically liked the little map at the top and wanted one for myself.

Screenshot of the top of Aaron's post checking in at Mozilla Portland. A small map in wide aspect ratio has a blue pin indicating the location among the streets in downtown Portland.

So, uh, almost a year later, I was inspired by this really great post on privacy-preserving, self-hosted maps by Sebastian Greger, to finally put together my own setup and promptly never blogged about it. I know this because I bookmarked his post and found the Git commit from June 25th, 2018 where I switch from Javascript-powered Mapbox (which I don't really recall setting up) to my own static map setup.

(Would we be shocked to discover that, on June 25th, 2018, I was checking in for that year's IndieWeb Summit? We should not be.)

Black and white map image with a purple push pin at the corner of SW 2nd Ave and SW Pine St in downtown Portland, OR. Map tiles provided by Stamen, contributions by OpenStreetMap contributors, etc.

The closest thing to a write-up on my own site I was able to find was this comment I had made on a great post by Jeremy Keith about a map project of his own:

I use https://github.com/dfacts/staticmaplite on my site. It’s no longer under development but, as long as you point it at a working tilemap server, it works fine! I switched out the URLs hardcoded in the PHP file for the Stamen β€œToner” tiles, using the tile server URL pattern on the Open Street Map wiki.

staticMapLite is a little PHP service you can self-host that creates plain old map images, of the locations you want at the sizes you want with overlays and pins if you want them, and caches them forever. It does so the same way as pretty much all map tools on the web: by asking bigger servers (called "tile servers", or "raster tile servers") for larger sets of "tile" images, then slicing up those tiles to make the image you want. The project is archived and hasn't seen updates since 2018, but it works fine! Raster tile server technology hasn't changed much since then.

Assuming, that is, that you have a raster tile server! You can run your own, but they require a ton of storage for all the map data, need regular updates, and generally are considered a pain to maintain.

When I set this up I remember looking over the list of raster tile servers on the Open Street Map wiki to find one that was free, didn't require signup, and produced map images that were aesthetic and minimal. With its dithered black and white look, Stamen's Toner definitely fit the bill. Stamen, those data visualization folks, right? I don't really remember thinking too hard about it!

We were promised a site update

Okay, okay! As it turns out Stamen also didn't like being maintainers of map tile servers. Especially when so many folks were freeloading on them!

To that end, this year Stamen announced a partnership with Stadia to begin hosting Stamen's many tile designs with Stadia, a map service with a business model, instead. The tile images remain shareable under their Creative Commons attribution license, I can keep all my existing cached images, and so on. They're offering a free tier of up to 200,000 tile images a month which is welllll below what I'll need for my few static images on rare times that I make checkin posts.

Stadia has their own page about the Stamen maps project, and a fairly straightforward migration guide to using Stamen map tiles served by Stadia tile servers.

So, I've updated my deployment of staticmaplite to pull tiles from Stadia. Steps largely followed their migration guide:

  • Make a (free) Stadia account.
  • Generate an API key.
  • Update staticmap.php to replace the "a.tile.stamen.com" map URL with "https://tiles.stadiamaps.com/tiles/stamen_toner/{Z}/{X}/{Y}.png?api_key=MY_API_KEY_HERE".
  • Update my post template with the new attribution requirements.

I went hunting around the map cache on my server to find the most recent map image and delete the cached image so it would re-generate. It took me a couple of tries to get my tiles.stadiamaps.com URL correct, as Stadia's example used lowercase placeholders like "{x}" while staticmapslite requires uppercase like "{X}". Also, Stadia supports an optional "{r}" value β€” either an empty string "" or "@2x" if you want double-resolution images for Retina displays β€” that staticmaplite doesn't understand (and that I opted not to use).

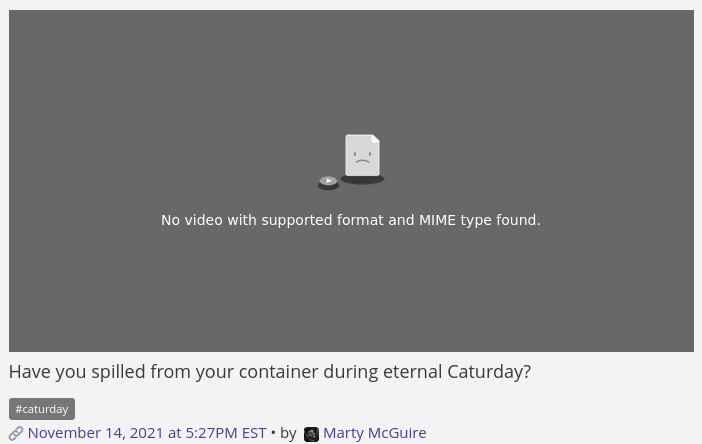
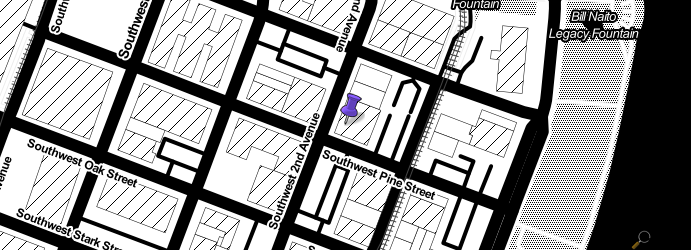
Anyway, here's that most recent checkin, using the new map image.

Map image of Brooklyn, NY with a purple pin near the southeast corner of 5th Ave and 3rd St. Map tile courtesy Stadia and Stamen and OpenStreetMap contributors.

Looks pretty much the same, which is the point!

So.

Was this a site update? Perhaps one long overdue from 2017 or 2018? Or is this a post about a very specific kind of admin tax? Or something else? I'm interested in your thoughts!

Tue Jun 27

Minor site updates

I've got a bunch of IndieWeb-related projects I'd like to work on. What I don't have is a good setup for working on bigger projects incrementally as I have time. The general pattern is that nothing happens for a very long time, then I become obsessed with a particular project and it fills my free time until it is "done" or I run out of steam.

All that to say, I recently had some lovely time on vacation and instead of working on big projects I did a bunch of little fixes to my site.

Probably the biggest is that my photos page now includes my daily-ish Caturday images. Previously it only pulled in still photos which, in the last couple of years, has only been from the very occasional check-in.

Marty's Photos page screenshot showing the top of a grid of square photos. The top three images are of a seated fluffy cat looking off-camera, two seated fluffy cats looking at an empty food dispenser, and a fluffy cat chewing on some twine. Each of the visible photos has a triangular "play" icon in the upper-right corner indicating that the linked post contains a video.

This was made pretty easy because I rely on Cloudinary to reformat my iPhone's "bounce" photos into a consistent mp4 format for the web and it's simple enough to change a Cloudinary URL for an mp4 video toΒ  a still thumbnail image instead.

Other updates:

  • After my recent struggles with Hugo (or Go templates) turning parsing invalid times into a fatal error rather than something I can work around, I finally removed my now non-functional workaround.
  • I toyed around with a "fast build" step by copying my site's Hugo setup and removing all content and layouts except those related to one or two new or updated posts. It seems like I could reasonably set this up to run immediately when I make a site update via Micropub so that new and updated posts are up immediately, while feeds and tag pages get updated when a full site build finishes.
  • I upgraded my little Digital Ocean droplet to try and reduce that "when a full site build finished" time. Looks like I doubled my monthly from $6 to $12 for an inconsistent time savings of 5-15 seconds on a ~1 minute build. πŸ˜…
  • I realized that my link preview meta crap for Slack / Discord / hellsites has been broken for a while. I kind-of fixed it for posts with titles, like this one, but it's still rubbish for my usual short posts, like Caturday. Caturday posts deserve to have image previews when shared on social media!

Always more to be done. These weren't the biggest or most important projects but it felt nice to be tidying up the place.

2022
Sun Nov 27

I'm (back) on "the Fediverse"

If you've got an account on a Mastodon server, or any server that speaks ActivityPub, you should be able to follow me at: @marty@martymcgui.re

Screenshot of my profile page on Bridgy Fed

Many thanks to Ryan for creating and running Bridgy Fed, which makes this possible. Over the years I've built a lot of IndieWeb building blocks into my site, and Bridgy Fed works with those to federate my posts with ActivityPub-powered sites like Mastodon.

So far I can send replies, let people know I'm following them, and they can follow me as well. You can see this in action on my site's Bridgy Fed profile page: https://fed.brid.gy/user/martymcgui.re

For now I'm manually choosing which posts to share via Bridgy Fed. I'll be using it for replies and likes, but haven't yet decided how much original content I'll be posting. For example, I don't know how well my daily Eternal Caturday video loops will come through, or if folks would actually want so many cat videos!

Sun Jul 31

Switching costs for an IndieAuth server

One of the things I love about building with IndieWeb building blocks is that (sometimes through more work than anticipated) you can swap out pieces of your site without (much) disruption because the seams between building blocks are well specified.

So, this is me documenting how I replaced my IndieAuth setup to stop leaning on Aaron’s IndieAuth.com (which has been on the verge of retiring any day now for some years).

Please excuse this long and rambling post. Feel free to skip around!

What is IndieAuth?

At a high-level, IndieAuth is a way to sign in using your website as an identity.

Without digging too deeply into the plumbing, you start by updating your website’s homepage with some extra header info that says “my IndieAuth service is over there”. From there, you can sign into services that support IndieAuth (like the IndieWeb wiki, the social feed reader service Aperture, and more. And you can use your IndieAuth server to protect your own services, such as a Micropub server that can create new posts on your site.

Why switch?

I’ve been using indieauth.com as my IndieAuth setup since late 2016 because it was easy to set up, because it uses something called RelMeAuth to let me sign in using services I already trust (like GitHub).

However, indieauth.com has been growing stale as the IndieAuth spec has evolved. indieauth.com’s maintainer has been discussing replacing it since at least 2017.

The inciting incident for my switch was looking at OwnCast - a self-hostable video streaming service with attached chatroom. OwnCast’s chat allows using IndieAuth to sign in, which sounded great to me, but OwnCast’s implementation wasn’t expecting indieauth.com’s old-style response format.

Why set up my own?

There are a bunch of IndieAuth server implementations listed on the IndieWeb wiki. However: simplest of them (selfauth + mintoken) are now out of date with the spec and haven’t been replaced, yet. Others tend to be built into other CMSes like WordPress. A couple of standalone servers exist but are in languages I am not comfortable working in (hello Rust and Go) or have deployment requirements I wasn’t thrilled about supporting (hello Rails).

I found Taproot/IndieAuth on this page and that looked promising - a PHP library intended to be deployed within a fairly standard PHP web app style (“any PSR-7 compatible app”).

I knew this would be some work but it sounded promising and so I began the week-ish long process of actually writing and deploying that “PSR-7 compatible app” built on taproot/indieauth.

tl;dr say hello to Belding

Belding is an “PSR-7 compatible” PHP web app that provides a standalone IndieAuth endpoint for a single user with a simple password form for authentication.

I would love to go into the process and pitfalls of putting it together, but instead I’ll link to the README where you can learn more about how it works, how to use it, its limitations, etc.

Switching costs for an IndieAuth server

1. Tell the World

First up, you’ll need to update the headers on your site. I switched my authorization_endpoint and token_endpoint to my new server from indieauth.com. Since I’m updating to support the latest spec, I also added the indieauth-metadata header (which should eventually replace the other two).

Now that your site is advertising the new IndieAuth server, you will likely experience logouts or weird access denied reponses everywhere that your site has been used with IndieAuth.

2. Tell your own services

I needed to configure my own “relying apps” so they know to talk to the new server when checking that a request is allowed. This list thankfully wasn’t too long.

Beyond the effort of getting my server working as an indieauth.com replacement, I also took steps to try and support the latest in the IndieAuth spec. That meant updating these micropub servers to use the new “token introspection” feature which has some tighter security requirements.

(Note: I initially made the same change for my self-hosted copy of Aperture, but found it would be too many changes for me to take on at the moment. Instead, I updated by IndieAuth server to allow the older and less secure token verification method used by Aperture.)

3. Sign-in to all the things again \o|

Once all my relying apps were all talking to the new IndieAuth server, it was time to re-sign-in to all the things:

Takeaways

There are a lot of improvements I’d like to make to Belding, but in general I am happy that it seems to work and, outside of the time to develop the server itself, my website and the tools I use to manage it were only broken for about a day.

I think it’d also be really nice to wrap up Belding a bit so it’s easy to configure and deploy on free-and-cheap platforms like fly.io. I believe it should be easier for folks to spin up and control their own IndieWeb building blocks where possible!

It’s also become clear to me that there are some user- and developer-experience holes around setting up relying apps. The auth requirements for token introspection, for example, means you need a way to manage access for each “backend” that you have that relies on IndieAuth to protect itself!

Long story short (too late) I am finally able to sign into OwnCast server chat using my domain. πŸ˜‚πŸ˜…

2021
Sun Nov 21

Saving the Caturday with a video proxy

Since at least 2018 I've been hooked on using iOS Shortcuts to post things to my site.

With IndieWeb building blocks like IndieAuth and Micropub, it's more or less possible to create Shortcuts do post any content you want to your personal site, mixing in images and video, and a lot more, all without needing third party apps running on your phone - or even in a browser!

The most important IndieWeb shortcut in my life the last couple of years is the one with which I have posted an animated cat photo to my site every day. In my phone's Photos app I would choose a Live Photo and make sure it's set to Bounce or (less likely) Loop, which will allow it to be shared as a video, then I'd use the Photos app Share function to send it to my Video Micropub shortcut. It would:

  • Allow me to trim the video
  • Upload the trimmed result to my site via my Micropub Media Endpoint
  • Prompt me for a caption for the video and a tag for the post
  • Post it to my site via Micropub where it will show up in few moments.

I've always found the Shortcut construction UI to be fiddly, and in general I find them difficult to debug. However, once a shortcut is working, they usually make my phone an incredibly powerful tool for managing what I share online.

Suddenly iOS 15 broke my Video Micropub with a non-debuggable "there was a problem running the shortcut" error. I've tried common workarounds suggested online, including re-creating the shortcut from scratch multiple times. It chokes at the media upload step every time.

Without this shortcut, I am kind of at a loss for how to post videos from my phone to my site. There are a number of great Micropub clients in the world, but none of them handles video. I've built Micropub clients of my own in the past, but I find it to be a lot of work each time updating things to keep up with changes in specs or library dependencies, and I find that I am not ready to commit to another one at this time.

Bizarrely, I have a different shortcut, probably thanks to Rosemary or Sebastiaan, which does allow me to upload files to my media endpoint, and get the resulting URL.

I combined that with a very quick and very dirty Secret Web Form that allows me to paste in the URL for the uploaded video, creating a Caturday post.

It's certainly more steps, but at least it's doable from my phone once again.

... or it would be if my phone was creating web-compatible videos!!!

For several versions of iOS (maybe starting with 12?), a new system default was introduced that greatly improved the efficiency with which photos and videos are stored on iOS devices. This is done by using newer and more intensive codecs to compress media files: HEIC for images, and HEVC for video. It turns out that these are not codecs commonly available in web browsers. You can work around this by changing a system-wide setting to instead save images and video in the "Most Compatible" formats - JPEG and MP4 (with video encoded as h264).

I'm not sure where the root of this change comes from, but for some of my Live Photos, making them a Loop or Bounce video creates an HEVC video and the only working shortcut I have to uploading them to my site takes them as-is. The result is a caturday post that doesn't play!

"No video with supported format and MIME type found" does not spark caturday joy.

So let us arrive at last to the day-saving mentioned in the title of this post.

I'm a big fan of the IndieWeb building block philosophy - simplified systems with distinct sets of responsibilities which can be composed to create complex behaviors using the web as glue. For example, the Micropub spec defines media endpoints with very few required features. The main one: allow a file to be uploaded and to get back a URL where that file will be available on the web.

The spec doesn't say anything about how to handle specifics that might be important. For example, an image on my phone may be a hefty 4 or 5 megabyte pixel party, but I don't want to actually display that whole thing on my website!

I could add some special handling to my media endpoint. For example, have it automatically resize images, save them in multiple formats suitable for different browsers, and more.

But I could also slip a service in the middle that uses the raw uploaded files to create exactly the things I want on demand.

This is where image proxies come in. They are web services that let you ask for a given image on the web, but transformed in some ways.

I have used and loved willnorris/imageproxy as a self-hosted solution. I currently use Cloudinary to handle this on my site today. Go ahead and find a still photo on my site, right-click to inspect and check the image URL!

It turns out that with some setup, Cloudinary will do this for smaller video files as well! This post is getting long, so here are the details:

  • Create an "Auto upload URL mapping". This is kind of like a folder alias that maps a path on Cloudinary to a path on your server. In my case, I made one named 'mmmgre' which maps to https://media.martymcgui.re/
  • Update your site template to rewrite your video URLs to fetch them from Cloudinary.

That's it!

So, for example, this video is a .mov file uploaded from my phone, encoded in HEVC: https://media.martymcgui.re/0d/93/a0/f1/be676103d289914ba9660cb8ba0eca2cb87a95c801d750ffc00bbfae.mov

The resulting Cloudinary URL is: https://res.cloudinary.com/schmarty/video/upload/vc_h264/mmmgre/0d/93/a0/f1/be676103d289914ba9660cb8ba0eca2cb87a95c801d750ffc00bbfae.mov

Cloudinary supports a lot of transformations in their URLs, which go right between the `video/upload/` bit and the auto-upload folder name (`/mmmgre/...`). In this case the only one needed is `vc_h264` - this tells Cloudinary to make this video encoded with h264 - exactly what I wanted.

And so, at last, I can post videos from my phone to my website again at last. The world of eternal Caturday is safe... for now.

... or it would be if I didn't need an extra step to ensure that my media upload shortcut actually sends the _video_ instead of a `.jpg`! I'm currently using an app called Metapho to extract the video in a goofy way that works for now but this stuff is mad janky y'all.

In the future:

  • I'd rather be hosting this myself, but since I'm already using Cloudinary and these Live Photo-based videos are very small, this was a huge win for time-spent-hacking.
  • Of course I'd much rather overall just have my friggin' shortcut friggin' working again, sheesh.
  • There has been some chatter in the IndieWeb chat about different approaches to handling video content and posts in Micropub clients. I may join in!
Sun May 2

Updating my Tor mirror to Onion Service V3

TL;DR: the Tor .onion mirror of this site has moved. The old .onion address will forward to the new .onion address until Onion Service V2 is deprecated later in 2021.

I've got a new home on the anonymizing Tor network! It's:

http://martymcgfuraocsgy2a25btl5srhifcdud6m4eiphz2mq6fafttwh7qd.onion/

Tor What Now?

Tor aka "the onion router" is an anonymizing network that protects the identity and location of users by bouncing their traffic through a set of volunteer servers, with encryption at each layer to make it harder for any given server to figure out who is sending what to whom.

Tor can also protect the identity and location of the sites and services that users are accessing, using a "rendezvous server" where the user's encrypted layers meet a similar set of encrypted layers to the server.

These were originally known as "hidden services", and are often what folks are referring to when they speak mysteriously of the "dark web". In recent years, to shake off some of the suspicion raised by the word "hidden", these have been renamed to Onion Services.

A Partial History

I first set up a ".onion" address for my site back in mid-2016 when I was playing with some decentralized web projects (decentralized web projects which I later forgot 😬). I used a tool called Shallot to generate a "vanity" URL that started with my usual online handle of schmarty. Once it was up and running, you could visit http://schmartyp7qtjzn7.onion/ and see the same content as my main domain https://martymcgui.re/

Sometime later (2019?) I got the hint from a (now lost to me) blog post to use Apache's mod_substitute to rewrite the HTML you get when visiting the site. This let me replace URLs for images, video, and other files from the not-onion website with .onion URLs. This cleanup keeps network requests for my content inside the Tor network.

Last year, the Tor Project announced Onion-Location, a way for sites to announce when they have a .onion version available. I added Onion-Location to my site so folks viewing it in the Tor browser could be redirected to the .onion version in one click. They also sent me some stickers for my trouble. Pretty neat!

Meanwhile, back in late 2017, Tor rolled out a new Onion Service version 3, with several improvements, including new, longer (and incompatible-with-V2) .onion domains. Folks running Onion Services were encouraged to move to the new system and in mid-2020 a timeline was announced to shut down V2 Onion Services.

I've had the upgrade on my list for a while and just hadn't got around to it. Then some discussion about V2 and V3 .onions in the IndieWeb chat got a little spicy and reminded me that I should just buckle up and do it.

Enough History, What About the Update?

What's in a (.onion) Name?

Today I hope that I am less vain than I was in 2016. I still wanted a little bit of myself in my new .onion address! So I grabbed mkp224o, a program for generating and filtering .onion address keys. The probability of generating a key with the a sequence that you want goes down very quickly as you make the sequence longer. So, the more specific your vanity desires, the longer you'll need to run a tool like mkp244o to have a chance to a .onion that you like. At 8 characters, "martymcg" seemed like pressing my luck, but I started it up and let it run overnight.

The next day, bless random number generation, I had a hit! This gave me the keys I'd need to run a site at martymcgfuraocsgy2a25btl5srhifcdud6m4eiphz2mq6fafttwh7qd.onion.

Is This Server Maintenance? πŸ’πŸ»β€β™‚οΈπŸ¦‹

With keys in hand, I set about getting this new onion service set up on the frankly ancient and creaky server that hosts my site.

I wasn't sure what minimum version of tor I'd need, and the server was running – oh my gosh – Ubuntu 14.04. So the update paused here while I reflexively upgraded to 16.04, breaking a bunch of my Python sites. After some time struggling to solve Apache mod_wsgi segmentation faults (!), I invoked YOLO Ops and upgraded to 18.04. Miracle of miracles – my sites worked again! Having pressed my luck once I decided not to go for 20.04 today. Did I learn anything from this? Probably not.

Unfortunately (and perhaps obvious in hindsight) the Ubuntu 18.04 package for tor was an obsolete version. Ultimately I added the Tor PPA and am, finally, running the recommended recent version of tor.

I Thought this was About an Onion Service

At last I was ready to set up this new V3 onion service. I copied over the files generated by mkp224o to a new folder under /var/lib/tor and updated the file permissions to match tor's expectations. (Seriously, make sure to follow the mkp224o README instructions for file ownership and permissions exactly or tor just won't start).

With the key files in place, I edited /etc/tor/torrc to make a new onion service definition for the domain, pointed at my web server. Shortly after, I could see my web server's default site at my new .onion domain and the rest of the process was more familiar website plumbing.

I copied the Apache virtualhost config from my old V2 .onion to a new config for the V3 .onion. This was pretty much just a copy/paste/find-replace job. With the new virtualhost enabled and Apache restarted, I could see my site!

Tor Browser screenshot showing the new .onion address and part of my homepage.

To make things official, it was time to clean up more Apache configs. I updated my main site to use the new .onion domain for Onion-Location, so Tor Browser users will be prompted to go there automatically. I also updated the old V2 .onion domain to redirect to the new one.

What's Next?

V2 .onions are set to stop working on Tor Browser in July 2021, and be entirely removed from the network in October 2021. At that point I'll shut down the old service.

While this website's update is done, I'm not finished upgrading personal onion services. I've got several that I've set up over the years for server-to-server connections and for services like Home Assistant that only "exist" on my home network but that I might occasionally access from out in the world. They're great for punching through firewalls!

What Does This Have to Do with IndieWeb?

The somewhat cataclysmic end of V2 onion services had folks in the IndieWeb chat questioning whether a .onion could ever be trustworthy for identity. It's true that the Tor Project is likely someday to replace and sunset V3 domains if a security need arises! .onion domain longevity is not a promised feature.

That said, V2 onion services were around for the past 15 years! My own V2 .onion domain has been up trouble-free for 5 years. That's longer than I've held many "real" domains! And, I didn't have to give my identity information and money to register my .onion like a regular TLD, or remember to feed the blockchain like Namecoin's .bit TLD, or worry about a DNS registrar bumping up prices, serving a takedown notice, letting a scammer transfer it away, squatting or selling it because I forgot to update my payment info, or getting caught up in trade and border disputes. Domains change and people move their stuff around. We figure it out.

I think a much (much) bigger barrier to IndieWeb adoption of .onions is the requirement of running a tor service and making requests through it in order to access onion services. Maybe it's not a big surprise (or hardship) that folks can only visit a .onion website via a specialized browser like Tor Browser. However, for many of the interactive building blocks of the IndieWeb to work, sites need to be able to talk server-to-server. Following feeds on .onion sites, or sending and receiving Webmentions with them, would require making a wide plurality of software "onion-aware".

Is that doable? Yeah, with a lot of goodwill, motivation, and collaboration.

Is it likely to happen? I guess that depends on how many folks make a .onion site their home on the web. 😏

2019
Tue Feb 19

Site Updates: /listens and /photos pages

Inspired by Jonathan LaCour's January post about tracking his podcast listening habits, I recently decided to bring in my own listening history into my website.

Like Jonathan, I use Overcast to listen to podcasts on my phone, and I was surprised and delighted to learn that Overcast has an "All data" export option on the accounts page that includes per-episode details such as whether you listened to an ep, and when you last interacted with it!

I took a look at Jonathan's script to automatically log in and import his Overcast data and figured I could make something a little more minimal that would work with my Hugo site.

My process follows three steps: download the overcast.opml full export file, run a script to generate the Hugo posts, and run a script to grab extra podcast metadata like cover art.

You can find my scripts in this gist if you're interested in learning more, but they may not be that useful for anyone without my exact Hugo config.

You may notice in the scripts that I have a "block list" of podcast URLs I can add. That's because I wanted my listen posts to helpfully link to and embed audio whenever possible. However, some of the feeds I subscribe to contain private or for-pay content - particularly a couple of podcasts I support on Patreon. I do want to track my listening habits for these podcasts, so I will likely start handling them differently by leaving out the embedded audio and linking directly to Patreon pages where possible.

Running the script, I was able to happily show everything I listened to as just another type of post on my site. However, it turns out I had (and keep making) a lot of listen posts. Visually they were drowning out all my other activity on my site.

So I have sequestered them on a new Listens page where you can only follow my podcast consumption history, keeping it out of my main feeds.

Similarly, I have been interested in having a nice Instagram-like page that shows off my photos in a grid. So I made a Photos page to show off those posts.

Both of these pages have microformats2 feed information embedded, so if you have an Indie reader, you might be interested in following just those pages!

2018
Tue Oct 2

Quick thoughts on project ideas from IndieWebCamp NYC 2018

I attended IndieWebCamp NYC 2018 and it was a blast! Check the schedule for links to notes and videos from the awesome keynotes, discussion sessions, and build-day demos. I am so grateful to all the other organizers, to all the new and familiar faces that came out, to those that joined us remotely, to Pace University's Seidenberg School for hosting us, and of course to the sponsors that made it all possible.

I have a lot of thoughts about all the discussions and projects that were talked about, I'm sure. But for now, I'd like to capture some of the TODOs and project ideas that I came away with after the event, and the post-event discussions over food and drink.

  • A Micropub Media Endpoint built on Neocities for storage and Glitch for handling uploads and metadata. It would allow folks to store 1GB of media files like photos, audio, and video for their websites, for free. It would be usable with all kinds of posting tools, no matter what backend you use for your site.
  • Improve the IndieWeb Web Ring (πŸ•ΈπŸ’.ws) to automatically check whether members' sites link back using Webmention. (I managed to make a small but often-asked-for update to the site during IWC)
  • Improve how my website handles all these check-in posts which are made when someone else checks me in on Swarm. I would like to show who checked me in, at least, if not some of their photos, or maybe even an embedded version of the post from their site.
  • Keep doing the This Week in the IndieWeb podcast! I had been feeling some burnout about this and falling behind. It was so great to talk with folks who listen to it and rely on it to keep up to date with the goings-on in the community!
  • Offer a hand with aaronpk's new social monster catching game, built on IndieWeb building blocks.
  • Offer a hand with jgmac1106's idea to issue educational course achievements (badges) via IndieWeb building blocks.
  • Work on closing down Camura, a photo-sharing social network I helped build during the awkward age after the first "camera phones" and before Facebook introduced "Mobile Uploads". It has over 100k photos and 50k comments from around 400 folks. I'd like to let it down gently, make sure people have access to those photos, and maybe even preserve some of the best moments of human connection in a public place.

More generally: I think there's a really cool future where IndieWeb building blocks are available on free services like Glitch and Neocities. New folks should be able to register a domain and plug them together in an afternoon, with no coding, and get a website that supports posting all kinds of content and social interactions. All for the cost of a domain! And all with the ability to download their content and take it with them if these services change or they outgrow them. I already built some of this as a goof. The big challenges are simplifying the UX and documenting all of the steps to show folks what they will get and how to get it.

Other fun / ridiculous ideas discussed over the weekend:

  • Support Facebook-style colored-background posts like aaronpk did at IWC. I love the simplicity of adding an RGB color as a hashtag.
  • "This American Bachelor" (working title only) - a dating site as a podcast. Each episode (or season??) is an NPR-style deep dive into the life and longings of a single person looking for love. Alternate title: "Single". The cocktail-driven discussion that produced this idea was a joy.

I am sure there are fun ideas that were discussed that I am leaving out. If you can think of any, let me know!

Sat Apr 14

Site Updates: automatic webmentions, person tags, better reply image handling

I had a bit of time this weekend to tinker with my site.

The biggest change is one that happens totally behind the scenes - I've added a step to the service that compiles and deploys my site to automatically send WebmentionsΒ from my posts to posts that I am responding to or mentioning. There are many folks with projects around this, but they tend to be a little more aggressive than I like in finding URLs to send mentions to. For example, they often want to send mentions to my homepage and avatar image for my own posts!

So, I have added a Webmention sender to my site that is triggered by new and updated pages and sends mentions to any URLs that I am specifically responding toΒ or person tagging, along with any URLs mentioned in the actual content of the post.

Along with this, I now support person tags on regular entries like this one. I can add a tag like http://tantek.com to a post and it will tag them with proper markup and, if possible, show the name and photo from their homepage h-card.

Finally, I did a little cleanup in how I display reply contexts for other people's posts that have multiple images in them, like this one from Aaron Parecki.

It's nice to be able to sit down and knock off the little nagging TODOs here on the site. That said, I'm hoping to be able to make some big changes, soon! We'll see what my schedule allows.

2017
Tue Oct 17

Native HTML5 captions and titles for audio content with WebVTT

This is a write-up of my Sunday hack day project from IndieWebCamp NYC 2017!
You can see my portion of the IWC NYC demos here.

Prelude: Videos for audio content

Feel free to skip this intro if you are just here for the HTML how-to!

I've been doing a short ~10 minute podcast about the IndieWeb community since February, an audio edition of the This Week in the IndieWeb weekly newsletter cleverly titled This Week in the IndieWeb Audio Edition.

After the 2017 IndieWeb Summit, each episode of the podcast also featured a brief ~1 minute interview with one of the participants there. As a way of highlighting these interviews outside the podcast itself, I became interested in the idea of "audiograms" – videos that are primarily audio content for sharing on platforms like Twitter and Facebook. I wrote up my first steps into audiograms using WNYC's audiogram generator.

While these audiograms were able to show visually interesting dynamic elements like waveforms or graphic equalizer data, I thought it would be more interesting to include subtitles from the interviews in the videos. I learned that Facebook supports captionsΒ in a common format called SRT. However, Twitter's video offerings have no support for captions.

Thankfully, I discovered the BBC's open source fork of audiogram, which supports subtitles and captioning, including the ability to "bake in" subtitles by encoding the words directly into the video frames. It also relies heavily on BBC web infrastructure, and required quite a bit of hacking up to work with what I had available.

The BBC Audiogram captioning interface.

In the end, my process looked like this:

  • Export the audio of the ~1 minute interview to an mp3.
  • Type up a text transcript of the audio. Using VLC's playback controls and turning the speed down to 0.33 made this pretty easy.
  • Use a "forced alignment" tool called gentleΒ to create a big JSON data file containing all the utterances and their timestamps.
  • Use the jqΒ command line tool to munge that JSON data into a format that my hacked-up version of the BBC audiogram generator can understand.
  • Use the BBC audiogram generator to edit the timings and word groupings for the subtitles and generate the final video.
  • Bonus: the BBC audiogram generator can output subtitles in SRT format - but if I've already "baked them in" this feels redundant.

You can see an early example here. I liked these posts and found them easy to post to my site as well as Facebook, Twitter, Mastodon, etc. Over time I evolved them a bit to include more info about the interviewee. Here's a later example.

One thing that has stuck with me is the idea that Facebook could be displaying these subtitles, if only I was exporting them in the SRT format. Additionally, I had done some research into subtitles for HTML5 video with WebVTT and the <track> elementΒ and wondered if it could work for audio content with some "tricks".

TL;DR - Browsers will show captions for audio if you pretend it is a video

Let's skip to the end and see what we're talking about. I wanted to make a version of my podcast where the entire ~10 minutes could be listened to along with timed subtitles, without creating a 10-minute long video. And I did!

Here is a sample from my example post of an audio track inside an HTML5 <video> element with a subtitle track. You will probably have to click the "CC" button to enable the captioning

How does it work? Well, browsers aren't actually too picky about the data types of the <source> elements inside. You can absolutely give them an audio source.

Add in a poster attribute to the <video> element, and you can give the appearance of a "real" video.

And finally, add in the <source> element with your subtitle track and you are good to go.

The relevant source for my example post looks something like this:

<video controls poster="poster.png" crossorigin="anonymous" style="width: 100%" src="audio.mp3">
  <source class="u-audio" type="audio/mpeg" src="audio.mp3">
  <track label="English" kind="subtitles" srclang="en" src="https://media.martymcgui.re/.../subtitles.vtt">
</video>

So, basically:

  • Use a <video> element
  • Give it a poster attribute for a nice background
  • Use an audio file for the <source> inside
  • Use the <track> element for your captions/subtitles/etc.

But is that the whole story? Sadly, no.

Creating Subtitles/Captions in WebVTT Format

In some ways, This Week in the IndieWeb Audio Edition is perfectly suited for automated captioning. In order to keep it short, I spend a good amount of time summarizing the newsletter into a concise script, which I read almost verbatim. I typically end up including the transcript when I post the podcast, hidden inside a <details> element.

This script can be fed into gentle, along with the audio, to find all the alignments - but then I have a bunch of JSON data that is not particularly useful to the browser or even Facebook's player.

Thankfully, as I mentioned above, the BBC audiogram generator can output a Facebook-flavored SRT file, and that is pretty close.

After reading into the pretty expressive WebVTT spec,Β playing with an SRT to WebVTT converter tool, and finding an in-browser WebVTT validator, I found a pretty quick way of converting those in my favorite text editor which basically boils down to changing something like this:

00:00:02,24 --> 00:00:04,77
While at the 2017 IndieWeb Summit,

00:00:04,84 --> 00:00:07,07
I sat down with some of the
participants to ask:

Into this:

WEBVTT

00:00:02.240 --> 00:00:04.770
While at the 2017 IndieWeb Summit,

00:00:04.840 --> 00:00:07.070
I sat down with some of the
  participants to ask:

Yep. When stripped down to the minimum, the only real differences in these formats is the time format. Decimals delimit subsecond time offsets (instead of commas), and three digits of precision instead of two. Ha!

The Future

If you've been following the podcast, you may have noticed that I have not started doing this for every episode.

The primary reason is that the BBC audiogram tool becomes verrrrry sluggish when working with a 10-minute long transcript. Editing the timings for my test post took the better part of an hour before I had an SRT file I was happy with. I thinkΒ I could streamline the process by editing the existing text transcript into "caption-sized" chunks, and write a bit of code that will use the pre-chunked text file and the word-timings from gentle to directly create SRT and WebVTT files.

Additionally, I'd like to make these tools more widely available to other folks. My current workflow to get gentle's output into the BBC audiogram tool is an ugly hack, but I believe I could make it as "easy" as making sure that gentle is running in the background when you run the audiogram generator.

Beyond the technical aspects, I am excited about this as a way to add extra visual interest to, and potentially increase listener comprehension for, these short audio posts. There are folks doing lots of interesting things with audio, such as the folks at Gretta, who are doing "live transcripts" with a sort of dual navigation mode where you can click on a paragraph to jump the audio around and click on the audio timeline and the transcript highlights the right spot. Here's an example of what I mean.

I don't know what I'll end up doing with this next, but I'm interested in feedback! Let me know what you think!