Automatic MakerBot Camera Pt. 4 - Updating ReplicatorG
In the previous posts in this series, I hacked up a Canon camera to take pictures with an electronic trigger, built a cable to connect the camera to my MakerBot, and hacked the MakerBot’s firmware to enable it to trigger the camera in response to commands from the controlling computer.
The final step was to hack the desktop software that controls the MakerBot - ReplicatorG.
What is ReplicatorG?
From the ReplicatorG website:
[ReplicatorG] is the software that will drive your CupCake CNC, RepRap machine, or generic CNC machine. You can give it a GCode or STL file to process, and it takes it from there. Its cross platform, easily installed, and is based on the familiar Arduino / Processing environments.
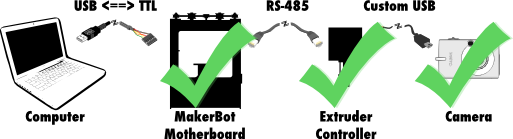
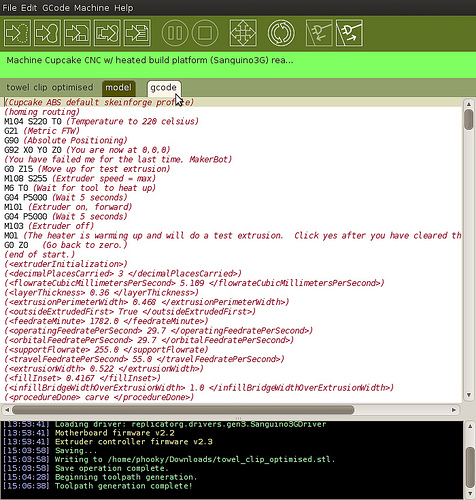
For my purposes, ReplicatorG provides two things. First, RepG is a user interface for controlling the MakerBot hardware:
Second, RepG reads G-code files describing how to build an object, and transmits them to the MakerBot over the USB:
Of course, ReplicatorG is open source, and the code is available on GitHub! So, it was simple to clone their repository and start hacking on it myself.
Camera Control via ReplicatorG
While it was relatively simple to update the extruder controller firmware to make it camera-aware, ReplicatorG is a bit more complicated. My first goal was to hack a new “Camera” checkbox into the control panel. Whenever the box was checked, the camera would take pictures. Whenever the box was unchecked, the camera would be idle.
You can find the code required for these changes in this commit on GitHub, but I will try to briefly break them down here:
- Define a new machine. In the
machines.xml.distfile, I defined an experimental MakerBot configuration named "EXPERIMENTAL - Cupcake CNC w/HBP and remote camera". It is essentially a copy of the typical MakerBot configuration with a heated build platform, but in the<tool>definition, I also added acamera="true"attribute. - Update the tool model. In
ToolModel.java, I added code to represent whether the tool has an attached camera, whether the camera is activated, and how to parse thecameraattribute out ofmachines.xml. - Update the machine driver model. In
Driver.java,DriverBaseImplementation.java, andSanguino3GDriver.java, I added the definitions and implementations totriggerCamera()andstopTriggeringCamera(). This is the code that actually sends theTOGGLE_CAMERAserial command to the extruder controller, which I also defined inToolCommandCode.java. - Update the control panel interface. In
ExtruderPanel.java, I added the code to draw a new label and checkbox named "Camera", if the machine is configured for a camera, and to respond to check/uncheck events by callingtriggerCamera()orstopTriggeringCamera().
Compiling and Running the new ReplicatorG
Compiling ReplicatorG is pretty simple, so long as you have a reasonable JDK environment and have Ant on your path. There are basically two steps:
- Copy
machines.xml.dist tomachines.xml`. - Run the proper
dist-linux.sh,dist-mac.sh, ordist-windows.sh.
ReplicatorG will be compiled and packaged up into the dist/ directory in two forms: an installable package for the chosen platform, and an unpacked version that you can run directly.
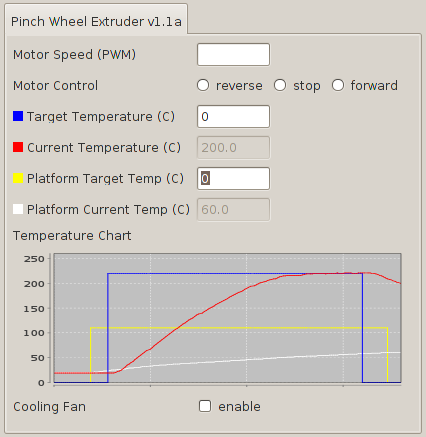
Opening up my modified version of ReplicatorG, I selected the “EXPERIMENTAL - Cupcake CNC w/HBP and remote camera” profile from the Machine -> Driver menu, opened up the control panel, and was happy to see this:
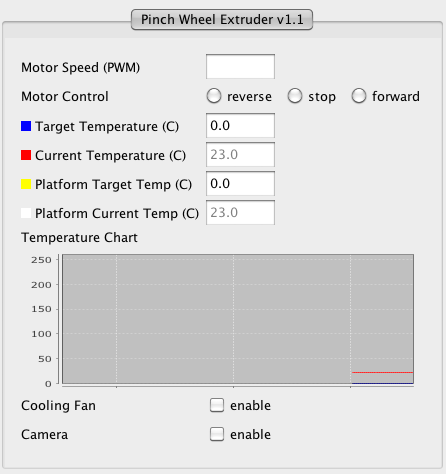
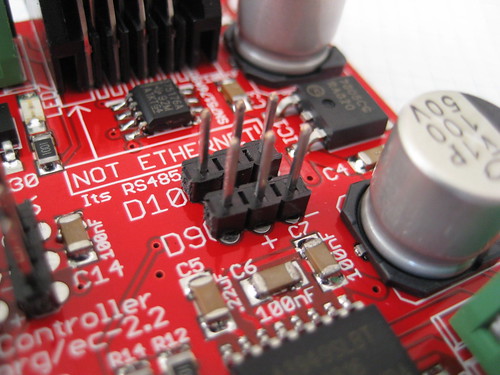
After hooking up my camera to the extruder controller’s D9 port, and starting the Remote Button script on the camera, I was able to take pictures by quickly toggling the camera checkbox on and off. I could also leave the checkbox activated to make the camera take pictures continuously.
Automatic Triggering with G-codes
Being able to trigger the camera by hand is all well and good, but my goal was to take pictures automatically at the end of every layer. To do this, I needed to be able to embed camera trigger commands in the G-code for building each individual object.
Looking at the ReplicatorG G-code docs, and the (machine-specific) M-code docs, I chose two codes for working with the camera:
M150- Trigger CameraM151- Stop Triggering Camera
I may have to change these in the future, as the main ReplicatorG development team claim G- and M-codes for other features, but these work for now.
Modifying ReplicatorG to accept these M-codes (GitHub commit here) was straightforward: update GCodeParser.java to recognize the codes, and call the appropriate triggerCamera() and stopTriggeringCamera() methods.
I could now construct a G-code file which, when “built” in ReplicatorG, would take a picture on demand:
M150     (trigger the camera)
G4 P700  (wait 0.7 seconds for the camera to activate)
M151     (stop triggering)
G4 P1300 (wait 1.3 seconds for the camera to finish)
Finally, it was time to edit up the G-code for the models I want to photograph.
Typically, G-code is generated by taking a 3D object in STL format and running it through the Skeinforge tool. Skeinforge is a set of Python scripts, which means it is not too difficult to insert your own code.
For now, however, I decided to make a simple hack using a Perl script I wrote called add_camera_events.pl. It works by looking for (</layer>) comments, which signal the end of a layer of printing, and inserts lines to:
- Move to a standard pose (
X=0, Y=-45), - Trigger the camera and wait for it to finish, and
- Move back to the original position
You can find the source for this script in the add_camera_events.pl gist. The source for all of my changes to ReplicatorG are on GitHub, in the “schmarty-camera” branch of my fork of ReplicatorG.
And with that, the computer aspect of this system was finally done!
Wrap Up
Phew! So far I’ve hacked a camera, wired it to the MakerBot, updated the MakerBot firmware to trigger it, updated ReplicatorG to trigger it, and written a script to update G-code files with camera triggers at the end of each layer.
So… does it work? You bet! Stay tuned for more examples and a breakdown video of this whole project in the final post in this series!
- Part 1: Remote control camera with CHDK
- Part 2: Wiring it up!
- Part 3: Updating the MakerBot Firmware
- Part 4: Updating ReplicatorG [YOU ARE HERE]
- Part 5: Printing with the Camera!