Marty McGuire

Posts Tagged games

2025
Tue Sep 16

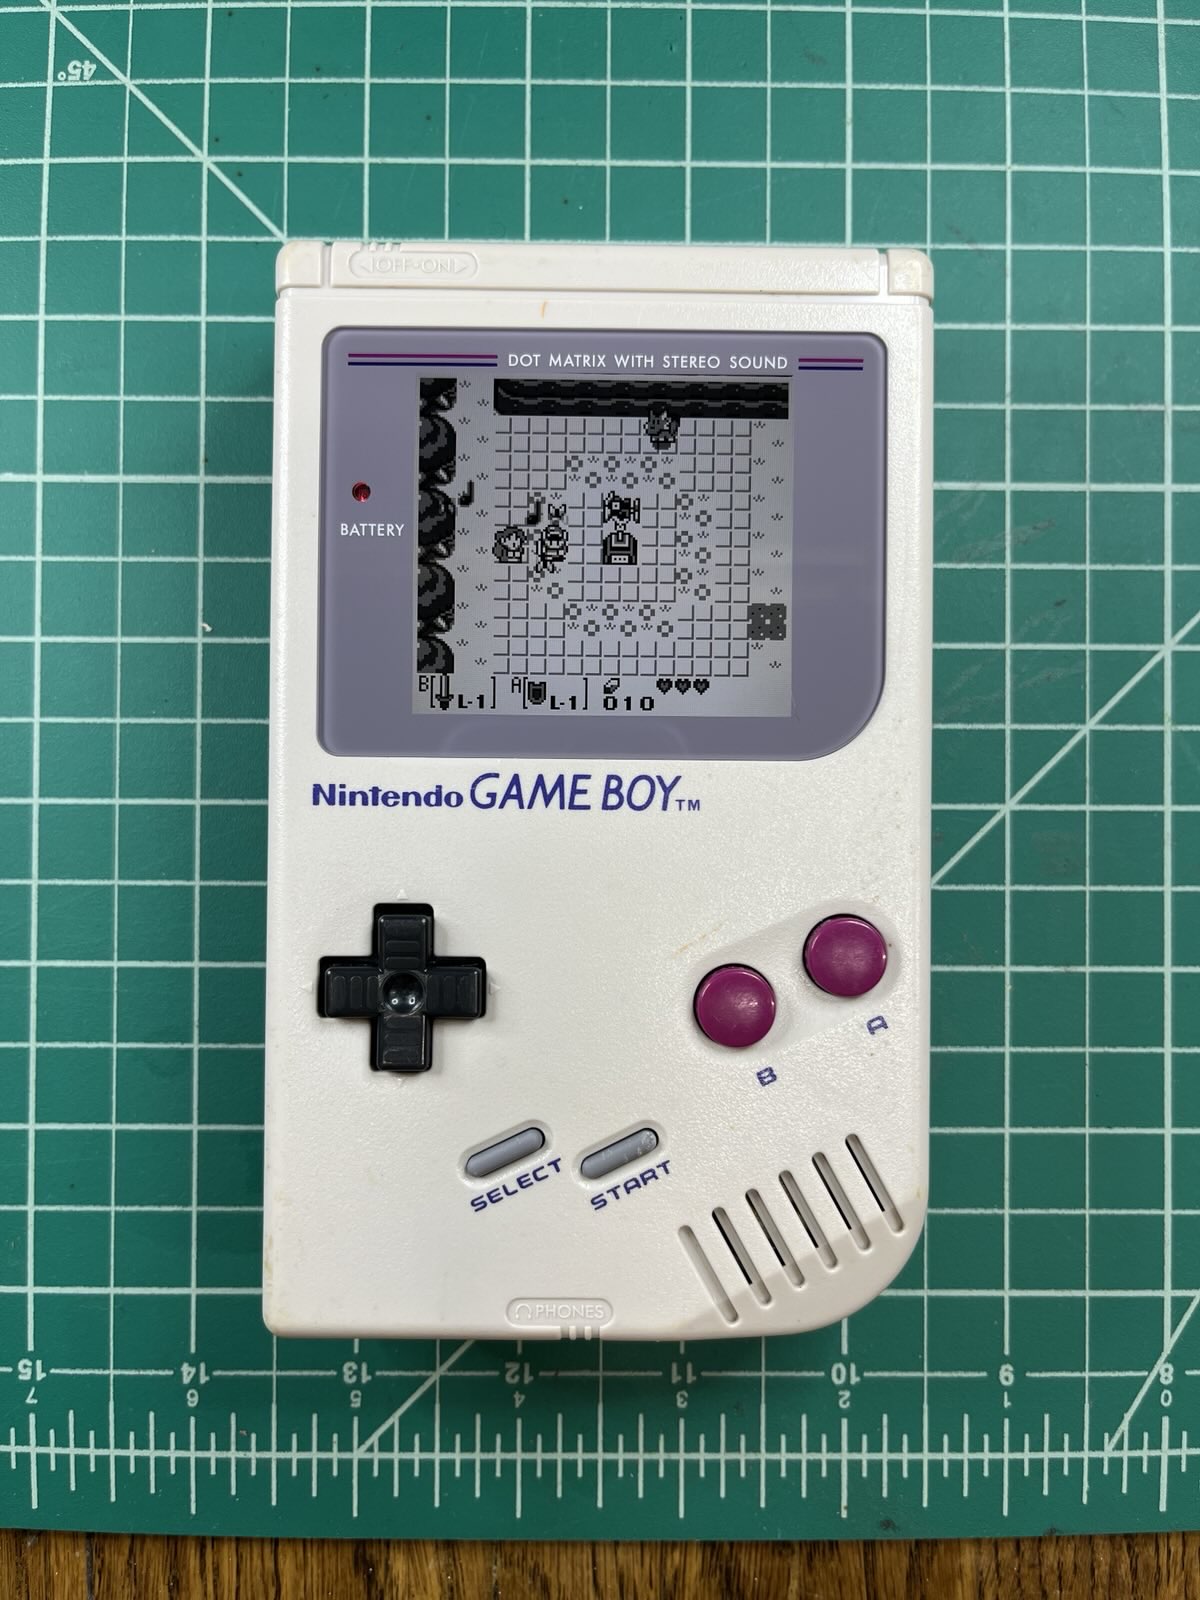
Stellar Scrapm'n is hauling on the Playdate

Last weekend, I joined forces with my buddy Hunter to make a game for PlayJam 8, a game jam for the adorable yellow Playdate game console.

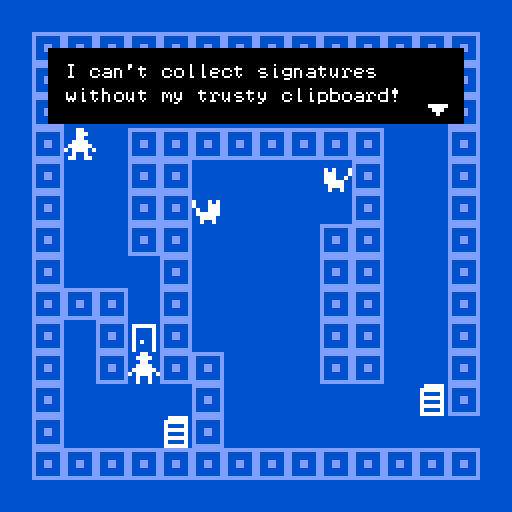
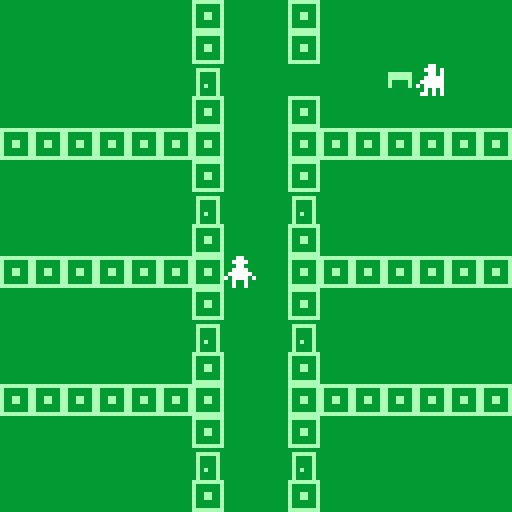
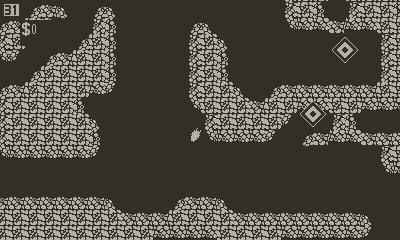
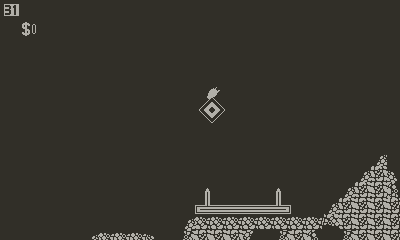
Introducing: Stellar Scrapm'n! Descend into debt as you ascend to the stars in a clunky little hauling ship. Crank to steer through rocky caverns in search of valuable junk you can sell to pay off a little bit of that financial liability at a time. Also: robots will shoot at you, pew pew, watch out!

Graphic design is my passion.

If you're so inclined, we'd be grateful if you checked it out! You can check out our jam entry to download, rate, and review.

If you have a Playdate, you can sideload the game. If you don't have a Playdate, you can still check it out by grabbing the Playdate dev kit and using the Playdate Simulator!

The review period is open until September 22nd. Check out the other submissions, too! There's slightly more than a dozen little games to check out.

Thanks for reading. You may also enjoy Hunter's post about the game / jam. Feel free to eject at this point because what comes next is-

Something like a dev log

A skippable cutscene for context

Hunter and I are both computer science boys with web business jobs. We don't write much code that looks like game code day to day, but we do enjoy dabbling in "the game dev". Hunter has done some pretty impressive projects in Unity in the past, I enjoy working through Godot tutorial content to keep up with that community, and we are both drawn to the rinky-dink little Playdate console with its retro-aesthetics, thoughtful constraints, and inviting dev tools and documentation.

Before we knew about Playjam, Hunter had been building up a Metroidvania game, inspired by working through SquidGod's YouTube tutorials for working with the Playdate. I recognized a lot of the fundamentals from working through a similar Godot course from Heart Gamedev. Neither of us had done a lot with Lua, but the Playdate API and docs offer a lot of structure for folks coming in with experience working with other languages.

When PlayJam 8 came across our radar, it seemed like the perfect opportunity to work on something together, sharpen our skills, and have fun making a thing. So, we cleared our calendars and set our expectations for success. How hard could it be? (This is foreshadowing.)

It starts with a theme

PlayJam8 kicked off on Friday with the announcement of the theme: ascending. Hunter and I (along with my producer, Amy) brainstormed a lot of potential concepts. Being nerds, we thought a lot about space and our nostalgia for retro games about space.

This is when Hunter introduced me to Space Shuttle Project for the Nintendo Entertainment System.

We did not make a "shot for shot remake" of Space Shuttle Project. You are free to imagine what it would be like!

We were more interested in making a game where you are in space, rather than getting to space. Unfortunately once one is in space, the concept of "ascending" becomes murky as references like "up" and "down" become negotiable. Another thing that is negotiable is money and getting to space is expensive. Hunter was reminded of Hardspace: Shipbreaker where, good news, you've got a cool space job but, oh no bad news, you're in crippling debt and the exchange rate for your hard labor will not fix that. Maybe you can ascend to financial freedom??

This sounded like a fun kernel of an idea, but of course we needed something simpler to implement. I was reminded of one of my favorite childhood games, Solar Jetman: Hunt for the Golden Warpship. This old ad for the game, in my opinion, does not explain the gameplay very well, but the vibes are incredible:

A vaguely game-shaped collection of mechanics

Based on our inspirations, we planned more-or-less these features:

  • A little ship that can navigate by rotating 360 degrees and using a thruster. "Space-like" in that there is no drag - objects in motion stay in motion.
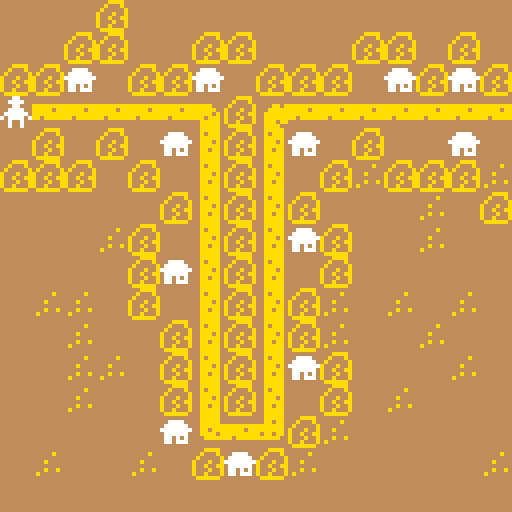
  • Navigating cavernous rocky spaces which can damage you if you bump into them.
  • Goodies to pick up and carry.
  • A base where you can drop off goodies for points / money / upgrades.
  • Obstacles and enemies to interfere with your fetching.
  • Weapons to destroy obstacles and enemies.
  • Multiple levels to progress through as you strip each environment of resources.
  • Interstitials for story.

Friggin' tools

Here are some things that we used:

Struggles

We had a lot of quick wins early on, but stubbed our toes many times. I'm tired, so this won't be hour-by-hour or day-by-day. Feel free to skip this unless you are future me (or Hunter)!

A recurring theme for me personally: I often knew the concepts for what I wanted to accomplish but had little or no practice directly with the tools, like LDtk and Aseprite. Climbing multiple learning curves during a crunch is stressful!

It's a little tricky to get curvy "cavernous" shapes with 2D tilemaps, but it's not too bad. What is bad is the feeling you get when the Playdate's native "axis-aligned rectangles only" physics system goes haywire every time your ship touches terrain. We reined in a lot of the chaos, but there are still plenty of places where a wall tile's bounding box doesn't line up with the actual pixels, making it look like your ship has suddenly stopped for no reason, or like you're embedded in the rock.

I went down a lot of rabbit holes for the physics issues, including evaluating alternate physics engines (which usually require building C extensions and wholly separate level-creation tooling) and adding a layer to take over to see if there was "really" a collision when the Playdate says there was. We simply ran out of time on this.

The other major toe-stubber was our choice to bring in, but not commit to, the Noble Engine.

The built-in concepts of Scenes that you can move between, with Noble taking care of transitions and lifecycle management, sounded like a great way to separate out concerns. Our focus started on the GameScene, which holds the level and player and enemies and collectibles and- you know, gameplay.

Unfortunately, we did not test our understanding of how Noble manages multiple scenes until very late. It turned out we were making sprites that Noble could not clean up on transition, loading things before Noble was ready, expecting things to be cached that Noble was throwing away, and more. A mess!

After finding this out so late, my instinct was to cut our losses and drop features like a title screen and different levels, which would have let us focus on building the game as if Noble's scene management stuff wasn't there. Unfortunately, I ignored that instinct and spent a lot of time moving code around, chasing down references, touching many parts of the project, breaking-and-fixing, finally getting things barely-working. The result is that we got our title screen, but we didn't have time to add any actual interstitials or extra levels. So... the menu basically serves no purpose, haha! Bonus: I accidentally left in a debug option in the player controls so you can bounce yourself to the title screen and back again and resume with everything exactly where you left it. And by "exactly where you left it" I mean it reveals some object cleanup bugs that we missed, as all enemies, collectibles, and even fired bullets suddenly return from the void! 😂

This was a triumph

I tend to focus on the negative, but this whole thing was pretty fun and we learned a lot! To ask "what would I do differently?" would be foolish - time only moves in one direction - I am grateful for the experiences and will carry this learning into the future.

Hunter and I both want to keep filling in the holes in the project, and (eventually) release something that feels like a complete game experience. I think that rules!

I look forward to becoming more fluent with the tools that were new to me! Theory is not the same as practice, and I could use more practice. Particularly the meta-practice of doing things that I am not already "good" at. Practice at being bad at something and struggling to get better.

Hell yeah!

Wed Jul 30

Retro Dot Cards Season One

Game Boy Advance, e-Reader, and a pack of cards. These photos don't really convey the excitement of the moment, haha.

Had a blast with Retro Dot Cards Series One for the Nintendo e-Reader from retrodotcards.com, created by Matt Greer.

That's right, new games printed on playing cards that can be scanned with a device from ~2002 using your Game Boy Advance or GameCube with Game Boy Player.

I think it's so cool that a dev community exists for these obscure devices, and that Matt has taken it so far as to write a bunch of games, produce them as cards, have them printed and packaged professionally, and sell them.

I have a nicely refurbished Game Boy Advance, but did not have an e-Reader at the time I learned of these, so I took to the e-Bay to find one. It actually took a while, and I had to pay more, to find an English version, as the original Japanese versions are more common. While you can buy Retro Dot Cards that work on any version of the reader (English, Japanese, or English-on-Japanese), if you plan to play other retro cards be aware that you need to match their language and region to your device or they won't work.

The cards and packaging from Retro Dot Cards were high quality and quirky. I enjoyed shuffling through them the first time. I cared less for trying to nicely fan them all out for a photo, above, because I wanted to get to playing them!

Each game (or app) is loaded with one to four "swipes" of a card. For example, Solitaire is a single card that you load by scanning one side, rotating the card 180 degrees, and scanning the other side. Exo Attack comes on two cards, for a total of four swipes through the reader.

The classics, like Solitaire, e-Snake, and Bomb Hunter (minesweeper) are minimalist, but well-made, colorful, and snappy to play. Exo Attack is a shoot-em-up with just one thing to shoot - the same boss with different behaviors - but it's also something of a provocation, with some quirky ship choices available. Speaking of quirky provocations: Franny Answers is like a combo Magic 8-ball and Tamagotchi with a cute and mysterious (or temperamental, or both) dog.

Some other absolute highlights include Scavenger Hunt (an achievements-based meta game!?), Exo Attack's code-based online leaderboards, and the old school instruction booklet online for each game.

The whole thing feels a bit like an invitation, too. To understand more about this old hardware, of course, but maybe also to make more things. Lurking in the footer of the Retro Dot Cards site is a Tools page with many e-Reader resources, including common sprites and backgrounds already present on the e-Reader that you can use in your own games and apps. Matt has also released the source code for e-Reader Solitaire, licensed MIT, and if that's not an invite I don't know what is.

Sun May 11

Made a little Bitsy game

This post is about a month overdue. As compensation, I will waive the customary subscription fee to read it.

Every month, Blake Andrews hosts a 2-hour game jam at Brooklyn indie arcade / bar / awesome place Wonderville.

I attended as my first in-person game jam on April 12th, where we were jamming on Bitsy. With Bitsy's browser-based editor, a bunch of great learning materials, and Blake's thorough live intro, it was easy to dive in!

Jam themes are chosen by asking Wikipedia for a random page. In this case, it was Town of North Fremantle, an Australian municipality that became a "town" in July of 1961, only to be amalgamated into the city of Freemantle, across the river, in November of the same year.

I kind of fixated on the idea of civic bureaucracy, going through a political process, and finding out that it was a pointless exercise. So, I decided to make a little game about collecting and filing signatures.

While Bitsy is lovingly simple, I have very little game jam experience and few skills, so I reused a lot of the default game assets, as I worked to just figure out how things are wired up. The base engine can do some pretty fun and complex stuff, but I found it confusing to find some concepts in the base editor. For example, an "if / else" block for dialog is under "Lists" because it is a "Branching List". My programming background expectations misled me several times.

In the end, I made a little thing, and even got to demo it live along with about a half-dozen other folks there.

You can find my jam entry here: Civil at Last, on itch.io. (I have my own itch.io page, now!)

Some screenshots of this work of art.

You can also play it right here!

Bitsy exports games as a single HTML file suitable for iframe embedding!

You can find more details about the jam, and links to all the entries, at the 2 Hr Game Jam Club April 2025 page at itch.io.

Let me know if you play and enjoy the game! Can you find all two endings??

Sun Mar 16

Refurbished a Game Boy

I'm trying to do things that get me out of the house and reduce the amount of time I look at torture rectangles (aka screens with internet). This Refurbish a Game Boy workshop from Craftsman Ave. felt like a perfect opportunity. Not only would I get some quality time in a (quality!) makerspace and get my hands dirty doing some tinkering (with expert guidance and few opportunities to truly mess up), but I'd also get to bring home a joy rectangle to improve the joy-to-despair ratio of rectangles in my life.

Selfie at the workshop. I'm wearing an Eternal Caturday t-shirt and masked up in an N95. Behind me in a gray button-up is my buddy Hunter, seated and not looking at the camera because I did not tell him I was taking this photo!

There were a lot of things to like about the workshop. The Craftsman Ave space itself combines super functional with ✨aesthetic✨. Or, to paraphrase how they put it, "we foster the illusion that beautiful things are made in beautiful places, when we know better." Workshop instructor Zach was super prepared, knowledgeable, and patient. Helping out was Chris who was so nice and humble, but did so much so smoothly behind the scenes, it felt like we were all his guests.

Did I mention prepared? Here come a bunch of photos about how prepared!

Machined plywood stations with milled-out tray areas for tools and for individual parts of the disassembled Game Boy units.
Soldering stations for transferring the speakers from the old units to their new media controller boards.
A Fender amp was perhaps overkill for testing Game Boy headphone output, but then again we were Very Sure when things worked.

The workshop accommodates up to 6 units being refurbished, either on your own or with a partner. We drew lots to determine the picking order from the set of available Game Boy units. (I keep writing "Game Boys", disliking it as a term, and replacing it with "Game Boy units". What is language?)

Anyway, here were the pickings for the evening!

A wooden table with 7 Game Boy units in various states of wear, tear, and aging. In the background are 5 clean shells, for any participants who want to skip the scrubbing steps.

I chose this sad boy which had very little sign of aging plastic but a lot of signs that it had probably been through a flood, with grit on the surfaces and in the holes, major signs of water damage on the screen, and all that was obvious before looking inside.

Front of pre-restoration Game Boy. Signs of grit and water damage.
Rear of the unit. Original stickers are quite worn, and there are more signs of grit.

Looking inside gave me some bad feelings...

Rear of the unit with battery door cover removed. Green corrosion covers the battery terminals.
Exposed motherboard of the unit after removing the back. Blue corrosion covers the copper heat sink.

Zach had us examine the media daughter boards of our units, which indicate when it was manufactured.

The exposed media board. This one is from 1989, indicating it is a first-revision.

We used tri-wing and Phillips screwdrivers to separate all the electronic parts from all the plastic parts, then put our initials on the plastic bits in Sharpie before giving them a soap bath and scrub-down to remove grit and grime.

Disassembled unit, with various screws and internal parts in their trays.
Cleaned case parts after soaking in soapy water and scrubbing with a toothbrush. Also pictured: the new media board soldered to the original speaker.

With the electronics disassembled, we took turns using the Fender amp to test whether our Game Boy motherboard worked, using a 6-volt power supply and alligator clips to the power terminals. Mine, unfortunately (but not unexpectedly) did not produce the signature "bling!" sound indicating a successful boot. So, it was taken away (for recycling or a viking funeral, I don't know) and I received a known-good working one.

After motherboard testing, we took turns at the soldering stations, removing the little mono speakers from the original media boards and attaching them to the new boards. Comparing the new sleek black PCB to the old crusty speaker had me pretty convinced the speaker wouldn't work.

There were even more things happening in parallel. Our new media boards were part of a full screen replacement, upgrading these units to crisp, backlit IPS displays, with brightness controls and many more features. Critically, the new screens are bigger than the originals, requiring some alterations to the case.

This is where Craftsman Ave's X-Carve machine comes into play. A custom jig holds the front of the Game Boy case in place, while a router bit removes two screw support posts, some space on the side for the new LCD's control toggle, and carves back the edges of the screen.

A short loop of the X-Carve machine removing a plastic post from the Game Boy case.

At some point, Zach gave us a little demo of removing corrosion from the battery terminals using vinegar. The acid eats away at the corroded bits in a bubbly reaction. These parts were too far gone to use, but Zach had plenty of spares.

A bubbly solution of corrosion and vinegar with a bluish tint.
Some time later, the solution has taken on a darker blue color.

I didn't take many photos of the actual process. Re-assembly went pretty quickly, with a few key pointers from Zach about tricky placements and order-of-operations. I appreciate the care taken to make sure our new front "glass" and screens were installed free of dust and fingerprints!

Finally, it was time to put in the batteries and put in a test game. While Zach had a lovely collection, I had made sure to bring my own.

Front view of the restored unit. A crisp black and white display shows a screen from The Legend of Zelda: Link's Awakening
Rear view of the restored unit. The original stickers are long gone, but so is the grime! Shiny and off-white.

There's definitely more I could say about the workshop, the people, the space. All were excellent! But for now, I'll leave you with an abrupt:

Finished Game Boy held in a hand. The screen shows in all caps "THE END".
2022
Sat Feb 26

Spoilers for https://nerdlegame.com/

These first two guesses will use up all available digits and operators:

9+8*7=65
3-4/2=01

Have fun with your high probability of getting 3/6 scores, forever! 🎉

(Why am I like this? 🙈😂)

2020
Wed May 13
🔖 Bookmarked Exploring Grief in Animal Crossing: New Horizons http://www.orderofthegooddeath.com/exploring-grief-in-animal-crossing-new-horizons

“During a time when we are unable to attend funerals or memorials for our loved ones and when we are unable to console each other in person, it’s comforting to have the means to do so through the soft and slow gameplay of Animal Crossing: New Horizons.”